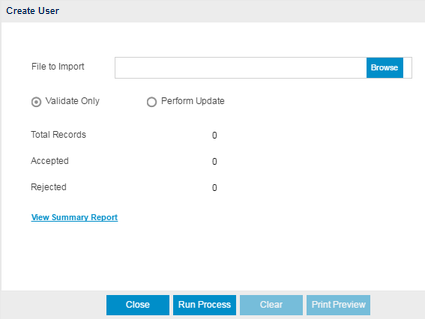
Create User
This screen lets the user create Self Service accounts. You may skip this step and click Finish.
To enable online payslips and other parts of Self Service, you need to add users.
All of your employees are found here. All we need to know is their email address and their user type to get going.
Prerequisites
Rules and Guidelines
- Fields that are marked with red asterisks (*) are mandatory.
Field Information
These fields display the employee's name.
This field displays the position number of the employee.
Select from the dropdown the access type for the corresponding personnel (e.g. employee or manager). The access to windows and processes will vary according to the role selected.
- Administrators get full access to the system. They can add employees and run payroll as well as change Security Settings.
- Managers are only enabled with an HR flavour. They get access to their teams. They can add and edit employees as well as authorise leave and timesheets.
- Employees only get access to their own data. They can create timesheet entries, book leave and access payslips.
Enter the employee's email address.
This is used to login to the system. Once entered here and when Finish is selected, the employee will receive an email with a temporary password, a welcome message, and the link to the Login screen.
Link
If you would rather import the data from a spreadsheet, you can download our template by selecting this link. If it is the first time you have added any data, then a dummy row will be displayed to help you. If you already have data, then that data will be downloaded to enable you to update it as well as add new data. You will need to remove the dummy data entered in the spreadsheet before import.
Although the file will open in Excel, it is important that it is saved as a CSV (Comma Separated Values) file. Otherwise, the import will not be completed.

Upload will allow you to browse to the downloaded file and bring it in to the system.

You can either perform a validation or update the system once the file is located using the Browse option.
- Validate will advise you if you have any issue with the file before importing, enabling you to change the data. Select this option to test the format of the file and fields.
After running the Validate Only process, the system will produce a report detailing that the update is completed, and if there were errors encountered during the validation.
- Perform Update will upload the data and display it in the Create User page of the Wizard for you to confirm by moving Next. Select this option to upload and update information in your database.
Select Finish to complete the Wizard.
Click this link --> Setup Wizard if you want to go to the Wizard's Help.